
Emmeline Suivant
Aspiring Cloud Engineer

Hosting a static website in AWS
As an aspiring cloud engineer, I embarked on a journey to showcase my skills and gain hands-on experience with AWS cloud services.
This article details my experience hosting my portfolio website on Amazon Web Services (AWS) using the following services : S3, Route 53 and CloudFront.
I followed the tutorial of A monk in cloud from his series of Youtube videos Serverless Web Application on AWS.
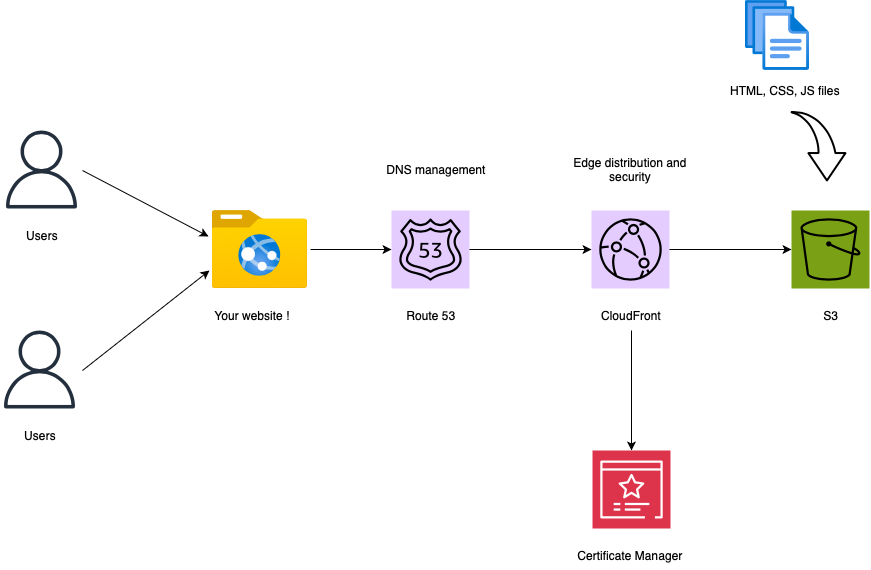
Table of Contents
- Write the HTML, CSS and JavaScript files
- Upload the files in an Amazon S3 bucket
- Register a domain name
- Request SSL/TLS certificate for AWS Certificate Manager
- Create a CloudFront distribution
- Test the website !
Write the HTML, CSS and JavaScript files
The initial step in bringing your website to life involves crafting the essential building blocks: HTML, CSS, and JavaScript files. This stage sets the foundation for your online presence.
Options for crafting Your Website:
- Develop Your Own:
- Template Usage:
If you're inclined to showcase your coding skills, creating your website from scratch is an ideal route. This approach grants you full control over the design and functionality.
Alternatively, for those seeking a polished website in a shorter timeframe, investing in a pre-made template can be an excellent choice. Platforms like EnvatoMarket offer a variety of templates, catering to different preferences and complexities.
Prices can vary from 10 to > 50 euros depending on the complexity of the template.
Ensure your project includes, at the minimum, the following files:
Upload files to an Amazon S3 bucket
In order to host your static website on AWS, you will need to upload your files in a S3 bucket.
Amazon S3 is a scalable object storage service, renowned for its durability, performance, and ease of use.
Because we are using CloudFront in this implementation, you don't need to name your bucket with your domain name.
Here is the parameters that I recommend :
By configuring your S3 bucket with these parameters, you establish a robust foundation for secure and versioned storage.
Register a unique domain name
Amazon Route 53 is Amazon Web Services' highly scalable and reliable Domain Name System (DNS) web service. It acts as your virtual traffic cop, directing visitors to the right resources by translating user-friendly domain names into IP addresses.
Now, let's add a touch of personalization to your website by acquiring a custom domain name. This is the web address that visitors will use to access your website.
Choose Your Domain Registrar:
AWS provides a straightforward option with Route 53, or you can explore other registrars like GoDaddy.
A little tip: ensure your AWS account is verified before attempting to purchase a custom domain – it can save you some head-scratching moments!
Domain name purchased, What's next?
With Route 53, AWS automatically creates a "Public Hosted Zone".
If you go with a different registrar, you'll need to create your hosted zone.
Associate Hosted Zone with Domain
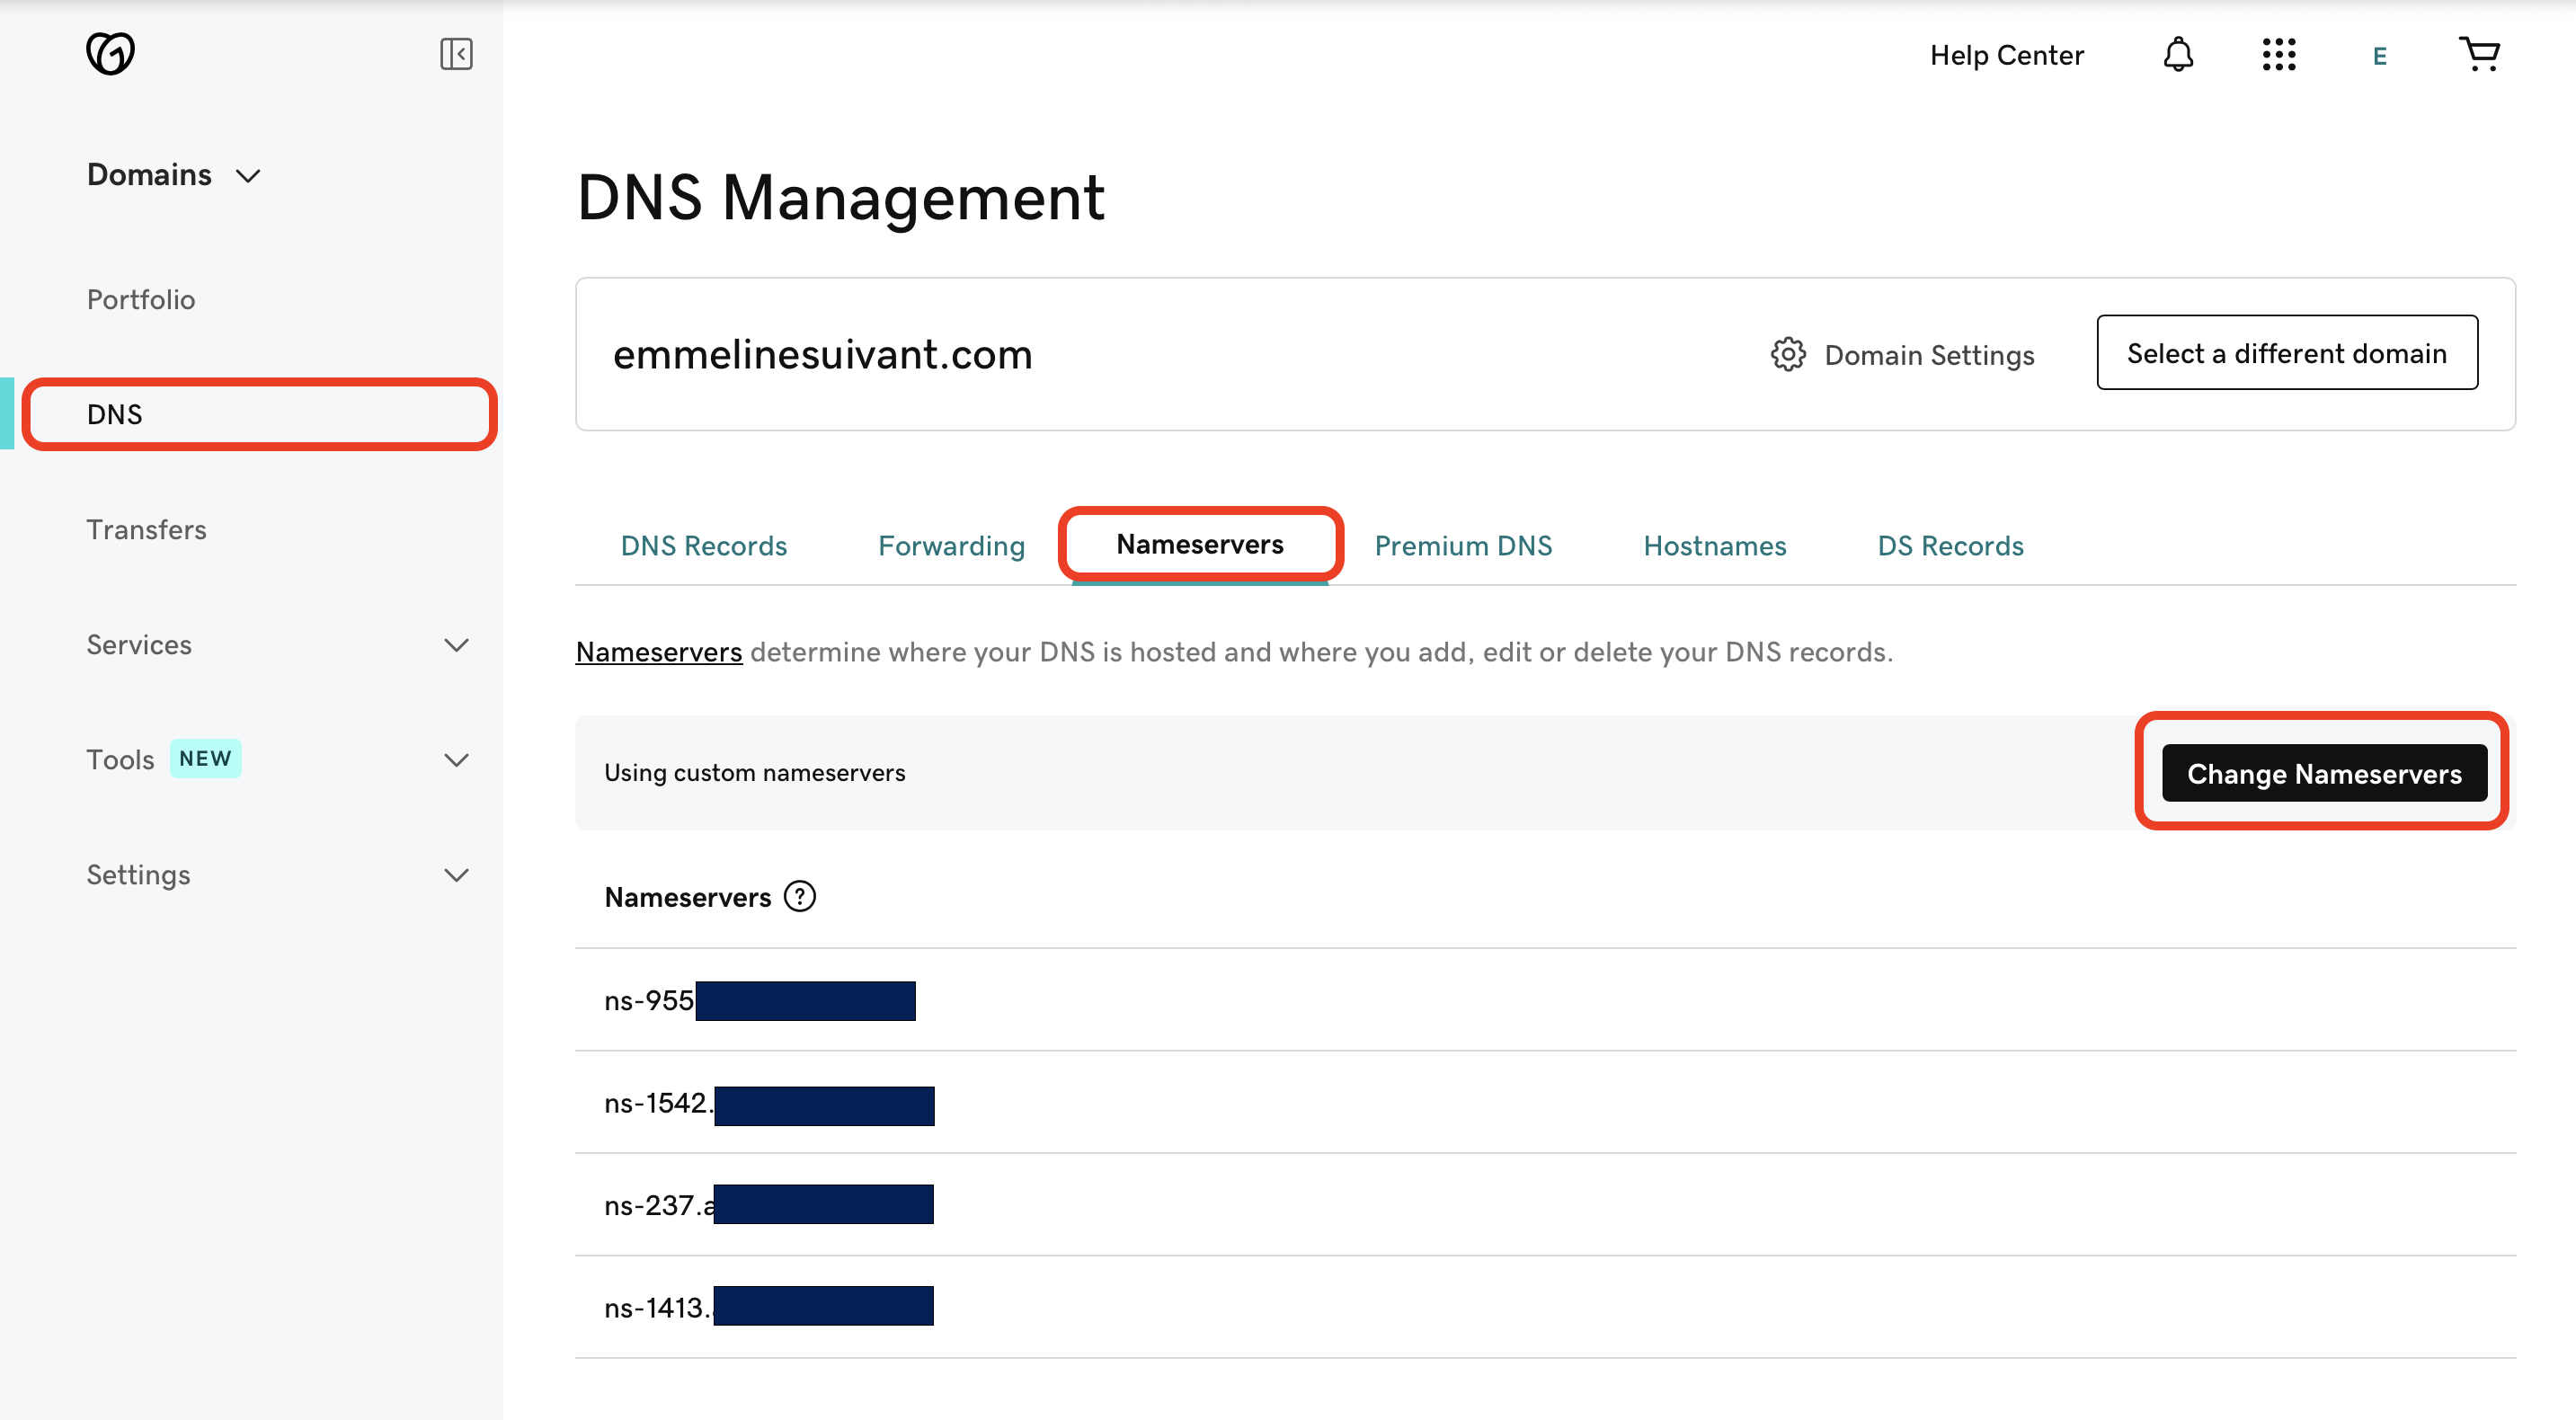
Next, I needed to link my AWS Hosted Zone with the domain I purchased from GoDaddy. This involves updating the nameservers – a set of instructions that direct traffic to your hosted zone.
You should creat a Hosted Zone with your exact domain name. Be careful of potential spaces before or after your domain name if you copy/paste it.
The type should be "Public Hosted Zone".
After your hosted zone is created, you should see your NS and your SOA records as follow :

Now, you want to link your AWS Hosted Zone with you domain name from GoDaddy for instance.
You can achieve that by associating the values of 'Value/Route traffic to' as the nameservers of your domain.
Securing My Website with AWS Certificate Manager
Ensuring the security of my website is a top priority, and that's where AWS Certificate Manager (ACM) comes into play.
ACM provides a seamless way to provision and manage SSL/TLS certificates for enhanced data encryption.
I associated my public certificate with the FQDN *.emmelinesuivant.com.
It might take a few minutes until your certificate is issued and ready to use.
Create a CloudFront distribution
Now that we have our files securely stored in an Amazon S3 bucket, the next step is to leverage the power of Amazon CloudFront to distribute our content globally.
CloudFront distribution acts as a caching layer that brings your content closer to end-users, reducing latency and improving the overall user experience.
Here is the list of parameters to use:
Allow a few minutes for your CloudFront distribution to be enabled.
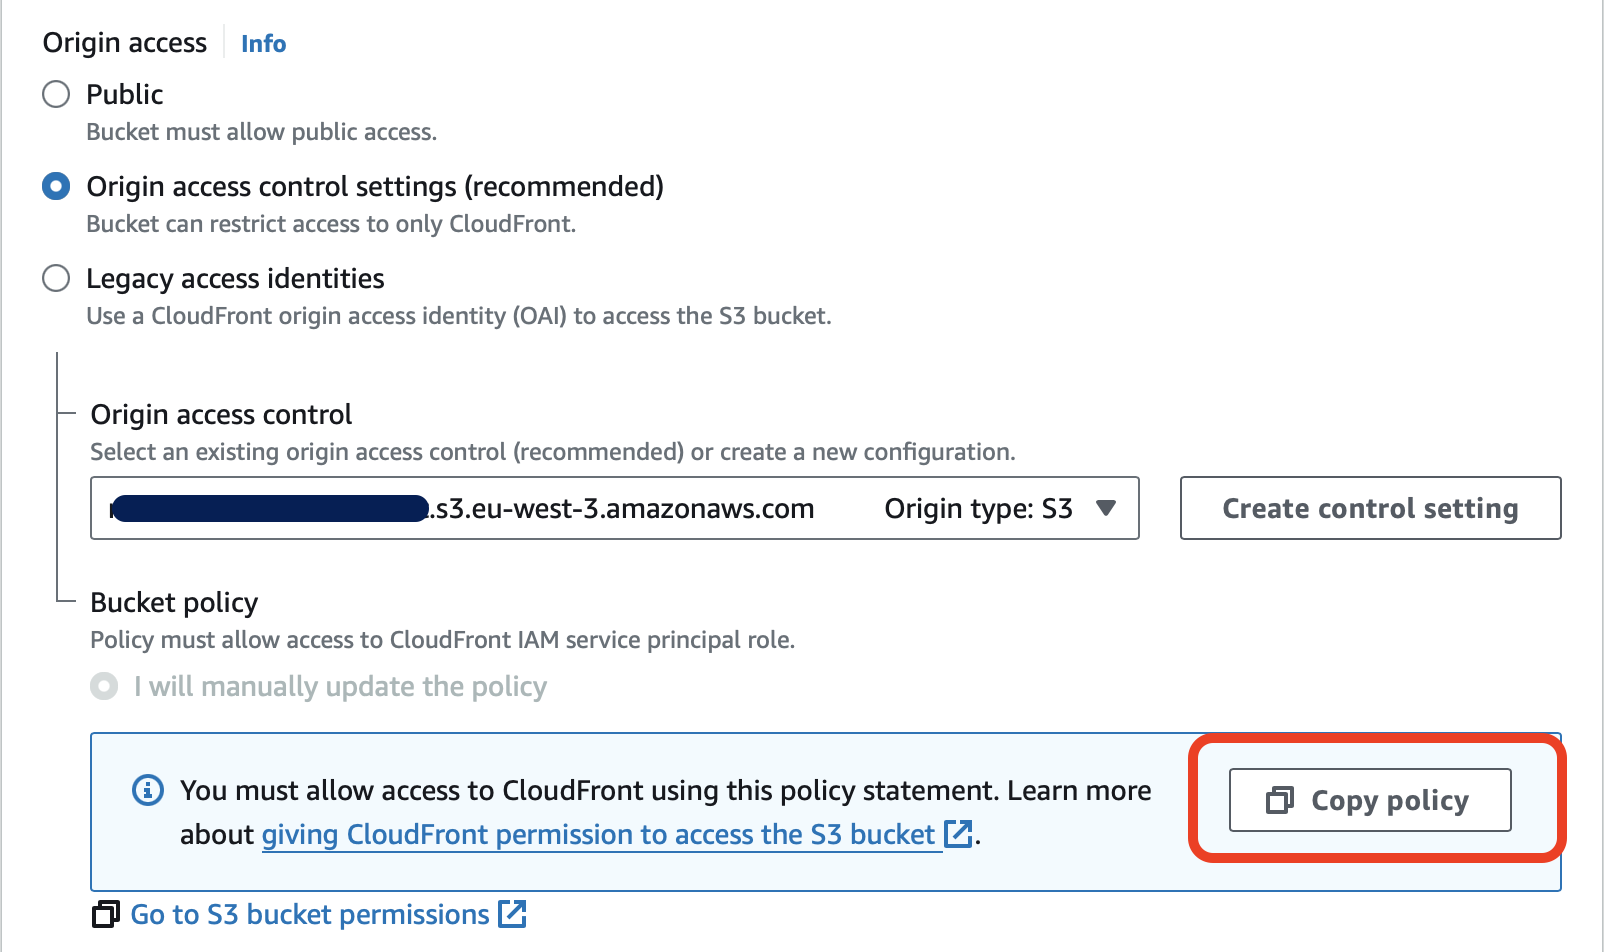
Afterward, update your S3 bucket policy to grant access to your distribution as its origin.
Where do you get the bucket policy ? Very simple : you get it from Your distribution > Origins > Your origin > Edit
Test the website !
We've reached the final steps to ensure that our static website is up and running seamlessly.
By now, we should have the following elements in place:
Now, let's perform some checks:
Remember, thorough testing ensures that your website is ready for public access. Once everything checks out, you've successfully hosted your static website on AWS using Amazon S3, Route 53, and CloudFront!
It's now time to share your work with the world. Congratulations!